Preppy nail are all about timeless elegance. They take inspiration from classic fashion elements like argyle patterns, plaid prints, and polished finishes. These sophisticated nail designs combine traditional styles with modern twists, resulting in looks that are both refined and fresh.
Why Preppy Nail Art is Popular

The increasing popularity of preppy nail art among teens and young adults can be attributed to its versatility. These designs effortlessly complement various outfits and occasions – whether it’s casual campus wear or formal events. The clean lines and structured patterns of preppy nails convey a put-together appearance that appeals to style-conscious individuals seeking a polished look.
Benefits of Preppy Nail Designs
A well-executed preppy nail design can:
- Enhance your professional appearance
- Add sophistication to casual outfits
- Create a lasting impression at social events
- Express personality while maintaining elegance
Discovering 10 Stunning Preppy Nail Designs
Ready to embrace this classic yet trendy style? We’ve curated 10 stunning preppy nail designs that combine traditional elements with contemporary flair. These looks range from subtle French manicures with unexpected color twists to bold checkerboard patterns that make a statement. Each design maintains the core preppy principles of neatness, sophistication, and timeless appeal while offering unique ways to express your personal style.
Let’s explore these eye-catching designs that will elevate your nail game and complement your preppy aesthetic.
Understanding Preppy Nails: Style and Inspiration
Preppy nail designs capture the essence of classic American style – polished, sophisticated, and effortlessly chic. These manicures blend traditional elements with modern touches, creating looks that work everywhere from college campuses to country clubs.
The signature preppy nail aesthetic emphasizes:
- Clean, well-maintained bases – perfectly shaped nails with smooth, even surfaces
- Precise application – crisp lines and carefully placed designs
- Traditional patterns reimagined in fresh ways
- High-quality finishes that look expensive and refined
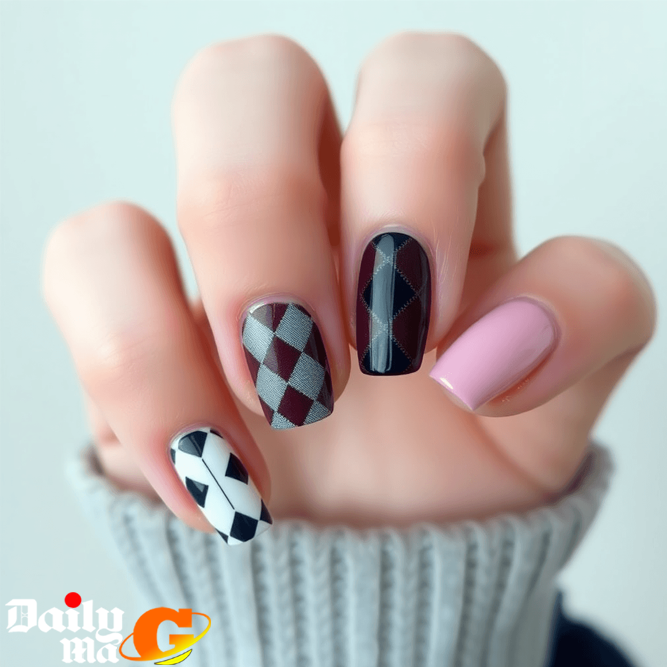
Popular Preppy Patterns
- Classic Plaid: Intersecting lines in navy, red, or hunter green
- Crisp Stripes: Vertical, horizontal, or diagonal in contrasting colors
- Checkerboard: Traditional black and white or playful pastel combinations
- Argyle: Diamond patterns that mirror preppy sweater designs
Nail Shapes for the Preppy Look
The right nail shape sets the foundation for preppy style:
- Squoval: Square with rounded edges – practical yet polished
- Oval: Naturally elegant and universally flattering
- Almond: Elongated with a tapered point – sophisticated choice
- Short Square: Clean and classic for an academic aesthetic
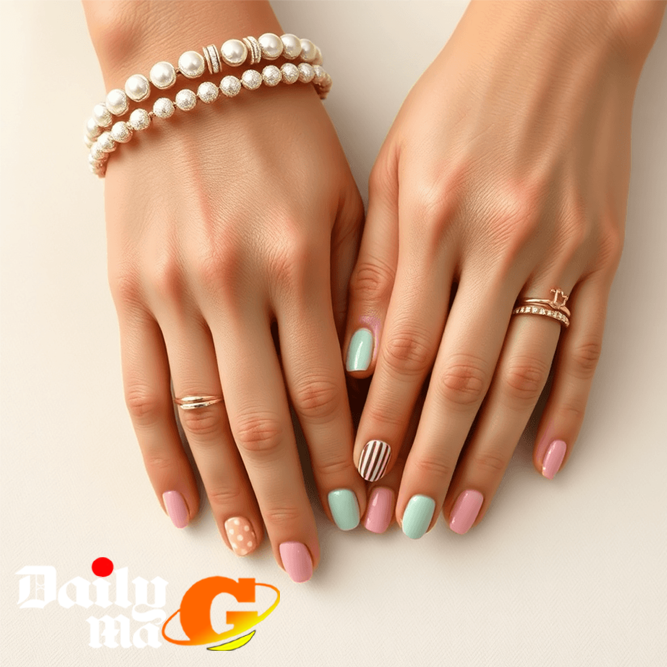
Color Selection
Preppy nail designs embrace both traditional and contemporary palettes:
- Timeless neutrals: Beige, cream, soft pink
- Classic preppy: Navy, burgundy, forest green
- Modern pastels: Mint, lavender, baby blue
- Bold accents: Gold, silver, pearl finishes
The secret to achieving the perfect preppy nail look lies in balancing traditional elements with personal style. Whether choosing understated French tips or bold plaid patterns, maintaining neat, precise application ensures your manicure stays true to preppy fashion’s polished roots.
Essential Tools and Products for Perfect Preppy Nails
Creating stunning preppy nail designs becomes effortless with the right tools and products. Leading brands like KISS imPRESS have transformed at-home manicures with their innovative press-on nail collections, making salon-worthy nails accessible to everyone.
What’s Inside a Press-On Nail Kit?
A typical press-on nail kit includes:
- Pre-sized artificial nails
- Prep pad with alcohol wipes
- Mini nail file
- Wooden manicure stick
- Clear instructions
- Storage case
The beauty of no-glue press-on nails lies in their simplicity and convenience. These modern alternatives eliminate messy adhesives and lengthy drying times. The advanced adhesive tabs provide secure attachment while protecting your natural nails from damage.
Selecting Your Perfect Size
Finding the right nail size creates a natural, professional look:
- Measure your natural nail width
- Compare with the size chart included
- Pick slightly smaller rather than larger sizes
- Test fit before removing adhesive backing
Essential Prep Tools
Keep these basic tools handy for flawless application:
- Nail clipper
- Buffer block
- Cuticle pusher
- Nail scissors
- Clean towel
- Cotton swabs
Shape Selection Guide
Different nail shapes complement various hand types:
- Squoval: Universal fit, perfect for beginners
- Oval: Elongates shorter fingers
- Almond: Creates elegant, slender appearance
- Round: Practical for active lifestyles
Quality press-on nails can last up to two weeks with proper application and care. The key lies in thorough preparation and choosing the right size and shape for your lifestyle. Many brands offer reusable options, making them both economical and environmentally conscious.
1. Classic Burgundy French Manicure with a Twist
The timeless French manicure gets a preppy makeover with rich burgundy tips replacing traditional white. This sophisticated twist maintains the classic elegance while adding depth and character to your nail game.
Creating the Perfect Burgundy Tips:
- Start with a clean, neutral base coat
- Apply nail guides or strips for precise lines
- Paint the tips with a deep burgundy shade
- Seal with a glossy top coat for shine
Modern Accent Ideas:
- Thin gold striping tape along the tip line
- Tiny pearl embellishments at the cuticle
- Matte finish on alternate nails
- Reverse French on accent fingers
This design works beautifully for both short and long nail lengths. The burgundy shade adds sophistication while maintaining the preppy aesthetic’s polished look.
Perfect For:
- Business meetings
- College interviews
- Formal events
- Holiday parties
- Dinner dates
The deep burgundy tone pairs wonderfully with fall and winter wardrobes, complementing classic pieces like blazers, sweater vests, and pleated skirts. This versatile design transitions seamlessly from day to night, making it a practical choice for busy schedules.
A pro tip: Use a thin brush for precise tip application, and always wait for each layer to dry completely before adding accents or top coat.
2. Pink Plaid Preppy Nail for a Playful Look
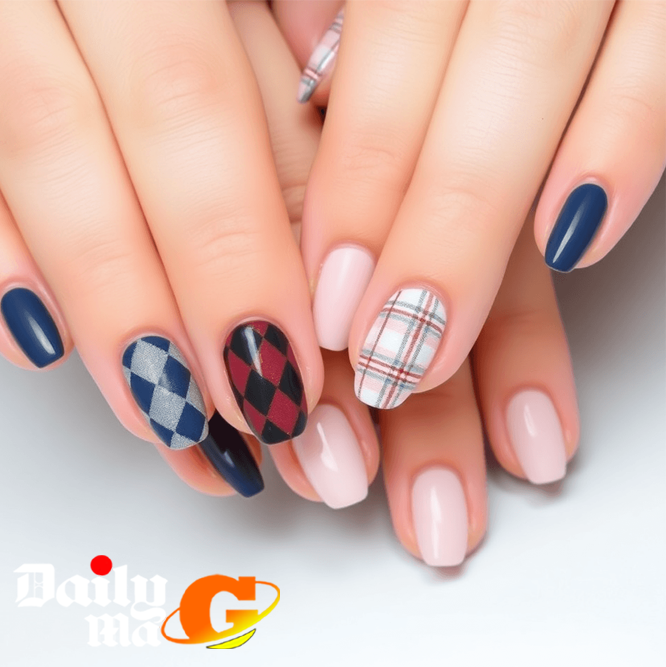
Plaid patterns bring a charming prep-school vibe to any nail design. The combination of pink and red creates a fresh take on the traditional plaid look while maintaining that classic preppy aesthetic.
Creating Your Pink Plaid Masterpiece:
- Start with a light pink base coat
- Apply thin red lines horizontally and vertically
- Add darker pink lines parallel to the red ones
- Create subtle crosshatching with a fine brush
- Seal with a glossy top coat
Press-on options make achieving this intricate pattern effortless. Many brands offer pre-designed plaid patterns in various pink shades, perfect for those who want the look without the detailed brushwork.
Style Pairings:
- Tennis skirts and polo shirts
- Cable knit sweaters
- Oxford button-downs
- Loafers or ballet flats
The short squoval shape keeps these playful nails practical for daily activities while maintaining their sophisticated charm. This design works beautifully for brunches, garden parties, or casual weekend outings.
For more information on different nail shapes, including the squoval shape, check out this resource.
Pro Tip: Choose press-on nails with a matte finish for a modern twist on the traditional plaid pattern. The subtle texture adds depth to the design while keeping it understated and elegant. If you’re looking for some inspiration on winter nail designs, be sure to explore this link.
3. Checkerboard Nails – Bold Yet Sophisticated
The checkerboard pattern brings a playful twist to preppy nail designs while maintaining sophistication. Dark pink and white combinations create a striking visual impact that’s perfect for both casual outings and special occasions.
Creating Perfect Checkerboard Patterns:
- Use nail tape or striping tools to section off squares
- Start with a white base coat
- Paint alternating squares in dark pink
- Apply squares in diagonal rows for easier application
- Seal with a high-shine top coat
The key to achieving clean lines lies in letting each section dry completely before moving to the next. A steady hand and patience make all the difference in creating crisp, professional-looking squares.
Pattern Placement Ideas:
- Full checkerboard on all nails
- Accent nail designs on ring fingers
- Mixed with solid dark pink nails
- Tiny checker patterns on French tips
Short to medium-length nails work best for checkerboard designs. Square and squoval shapes provide the ideal canvas, offering enough space for distinct squares while maintaining the preppy aesthetic. The flat surface allows for precise pattern application and helps prevent distortion.
For beginners, press-on options featuring pre-designed checkerboard patterns offer a foolproof alternative. These come in various sizes and can be mixed with solid-colored nails for a customized look.
4. Gold Glitter Polish Accents for Glamour
Gold glitter polish adds a touch of sophistication to any preppy nail design. The key is strategic placement – selecting one or two fingers as accent nails creates visual interest without overwhelming the classic preppy aesthetic.
Creating the Perfect Glitter Accent:
- Apply a clear base coat to protect your natural nails
- Choose a high-quality gold glitter polish with fine particles
- Paint the accent nail(s) with 2-3 thin layers for optimal coverage
- Seal with a glossy top coat for lasting shine
Essential Tools:
- Thin brush for precise application
- Lint-free wipes to clean edges
- Quick-dry top coat
- Liquid latex barrier (prevents glitter spread)
The beauty of gold glitter accents lies in their versatility. Pair them with solid pastels for daytime looks or deep navy for evening events. The shimmer catches light beautifully, drawing attention while maintaining preppy sophistication.
Pro Tips:
- Apply glitter in thin layers to prevent clumping
- Use a makeup sponge to dab on glitter for maximum sparkle
- Consider a gradient effect – concentrated glitter at the tips
- Remove with acetone-soaked cotton wrapped in foil
Gold glitter accents work particularly well on ring fingers or thumbs, creating a balanced look that enhances rather than overshadows your preppy style. The combination of sparkle and restraint perfectly captures modern preppy nail aesthetics.
5. Soft Sweater Texture Inspired Nails
Bring the cozy charm of your favorite knit sweater to your fingertips with textured nail designs that capture winter’s warmth. This unique style combines comfort with sophistication, creating a preppy look perfect for the cooler months.
Creating the Perfect Sweater Texture:
- Use a thin detail brush to paint vertical lines
- Add gentle crosshatching for a cable-knit effect
- Apply matte top coat to enhance the woolly appearance
- Create raised texture with builder gel for 3D effects
Ideal Color Combinations:
- Cream and ivory – mimics classic aran sweaters
- Soft gray – captures cashmere elegance
- Baby blue – reminds of winter skies
- Blush pink – adds feminine charm
- Oatmeal beige – embodies cozy comfort
The secret to achieving authentic sweater-inspired texture lies in the application technique. Start with a base coat in your chosen pastel shade. Once dry, use a thin brush to create delicate lines that intersect like knit stitches. For dimensional effects, builder gel can be carefully sculpted to mimic raised cable patterns.
Pro Tips:
- Keep lines thin and evenly spaced
- Work in small sections
- Allow each layer to dry completely
- Use light pressure when creating patterns
- Consider accent nails with pearl embellishments
This design works beautifully on both natural and acrylic nails, making it versatile for any nail type. The subtle texture adds interest while maintaining the polished preppy aesthetic that’s essential for this style.
6. Pink Chrome Nails for a Trendy Shine
Pink chrome nails add a stunning metallic touch to the preppy style. This attention-grabbing finish creates a shiny surface that reflects and sparkles with every movement of your hands. The shiny quality of chrome polish turns plain pink into a multi-dimensional shade that beautifully catches light.
Creating the Perfect Pink Chrome Look
To achieve the ideal pink chrome effect, you’ll need:
- A smooth base coat application
- High-quality chrome powder in your chosen pink shade
- Proper buffing technique for maximum shine
- UV-cured top coat for long-lasting results
Versatility of Pink Chrome
The beauty of pink chrome is its adaptability – it looks great on:
- Full nail coverage for a bold statement
- French tip variations
- Accent nails paired with classic finishes
Shade Selection Tips
When choosing shades for your pink chrome nails, consider the following:
- Rose gold chrome for subtle sophistication
- Bright pink chrome for making a statement
- Soft pink chrome for everyday elegance
The metallic sheen of chrome elevates traditional preppy style by adding a modern twist without losing its timeless charm. It creates depth and interest while still maintaining the polished look that is essential to preppy aesthetics. This contemporary interpretation pairs perfectly with both casual preppy outfits and dressier ensembles.
For those who prefer press-on options, pre-chromed nails offer an easy way to achieve this luxurious look without the complicated application process. Look for sets that feature chrome finishes in different shades of pink to match your desired level of shine and sophistication.
7. Minimalist Smiley Face Nail Art for Fun Flair
Add a playful twist to your preppy aesthetic with charming smiley face accents. This design brings personality to your manicure while maintaining sophistication through minimalist execution.
Perfect Base Colors:
- Soft beige
- Baby pink
- Light lavender
- Pale yellow
- Classic white
Creating these adorable smileys doesn’t require professional skills. Start with a solid neutral or pastel base coat. Once dry, use a thin nail art brush to draw tiny black dots for eyes and a curved line for the smile. For beginners, nail art stickers offer a foolproof alternative – simply place them strategically on 1-2 accent nails.
Quick Application Tips:
- Apply base color in thin, even coats
- Let each layer dry completely
- Position smileys slightly above nail center
- Seal with clear top coat to prevent smudging
Keep the design balanced by limiting smiley faces to accent nails while leaving other nails in solid colors. This creates visual interest without overwhelming the preppy vibe. Try pairing a nude base with gold smiley faces for an elevated take on this playful trend.
For extra precision, use a dotting tool to create perfectly round eyes. Experiment with different expressions – winks, hearts for eyes, or tiny bows add variety while maintaining the clean preppy aesthetic.
8. Floral Motifs – Timeless Elegance on Nails
Floral designs bring a delicate touch to preppy nail aesthetics while maintaining sophistication. These botanical-inspired patterns work beautifully on various nail lengths and shapes, creating a perfect balance between classic and feminine styles.
Popular Preppy Floral Patterns:
- Tiny daisies scattered on a nude base
- Miniature roses in pastel pink and white
- Delicate cherry blossoms with thin branches
- Small forget-me-nots in baby blue shades
The secret to keeping floral designs preppy lies in the color palette and placement. Opt for soft, muted tones like blush pink, powder blue, or gentle lavender. The flowers should appear dainty and well-spaced rather than overwhelming.
Creative Combinations:
- French tips adorned with small flower accents
- Plaid base with floral overlay on accent nails
- Alternating solid-colored nails with floral patterns
- Negative space designs incorporating subtle blooms
For easy application, press-on nails featuring pre-designed floral patterns save time while ensuring professional results. Look for sets with clear backgrounds or neutral bases to maintain that classic preppy appeal.
Pro Tip: Keep the design balanced by limiting florals to 2-3 nails per hand. This approach maintains elegance without overshadowing the preppy aesthetic.
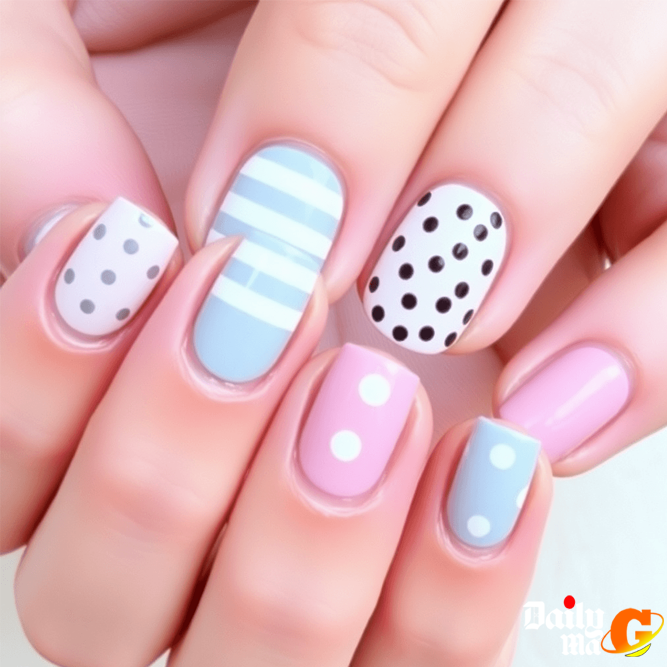
9. Mixing and Matching Patterns with Coordinated Colors
Pattern mixing creates eye-catching nail designs when executed thoughtfully. The secret lies in selecting a cohesive color palette that ties different patterns together seamlessly.
Creating Balance with Mixed Patterns:
- Use one dominant pattern (like stripes) and complement it with a subtler secondary pattern
- Keep patterns in similar size proportions across nails
- Limit yourself to 2-3 patterns maximum per manicure
Color Coordination Tips:
- Choose a primary color and work with its complementary shades
- Stick to the same color intensity across patterns
- Use neutral tones to break up bold pattern combinations
A classic preppy mix includes navy stripes on two fingers, pink gingham on another two, and solid colored nails to balance the look. The key is maintaining clean lines and precise application regardless of pattern complexity.
Popular Pattern Combinations:
- Diagonal stripes with polka dots
- Plaid with tiny hearts
- Checkerboard with micro florals
- Argyle with solid glitter accents
The beauty of pattern mixing lies in personalization – select patterns that reflect your style while maintaining the preppy aesthetic through careful color coordination and precise execution.
10. Short Squoval Nails – The Perfect Preppy Shape
Short squoval nails are the ideal preppy style – a perfect mix of elegance and practicality. This shape combines the straight edges of square nails with gently rounded corners, creating a natural-looking silhouette that goes well with any preppy nail design.
Why Short Squoval Nails Work:
- Maintains a clean, polished appearance
- Reduces the risk of breaking or chipping
- Creates an ideal canvas for intricate preppy patterns
- Suits both casual and formal occasions
The versatility of short squoval nails makes them a go-to choice for daily activities. Their modest length allows you to:
- Type comfortably on keyboards
- Handle contact lenses with ease
- Play sports without interference
- Manage delicate tasks precisely
When selecting press-on nails, opt for sets that mimic this natural-looking shape. Many brands now offer short squoval options specifically designed for the preppy aesthetic. The shape’s clean lines work beautifully with:
- Classic French manicures
- Minimalist designs
- Bold patterns
- Solid color applications
For those new to press-on nails, short squoval shapes provide excellent stability and adherence. Their balanced proportions create a flattering look on all finger sizes, making them universally appealing for achieving that perfect preppy style.
Buying Guide for Press-On Preppy Nails Online
Shopping for press-on nails online opens up endless style possibilities – but finding reliable sellers requires some savvy research. Here’s what to look for when purchasing your perfect preppy press-ons:
1. Trusted Marketplaces
When buying press-on nails online, it’s important to choose trusted marketplaces to ensure you’re getting high-quality products. Here are some reliable platforms to consider:
- Major beauty retailers like Ulta and Sephora
- Brand websites (KISS, Static Nails, Olive & June)
- Amazon sellers with verified reviews
- Etsy shops specializing in custom press-ons
2. Quality Indicators
To assess the quality of press-on nails before making a purchase, pay attention to the following indicators:
- Clear product photos showing nail details
- Size charts with measurements
- Kit contents listed comprehensively
- Return/exchange policies
- Customer reviews with photos
3. Price Comparison Tips
To ensure you’re getting the best deal on press-on nails, here are some tips for comparing prices:
- Sign up for brand newsletters to get first-time buyer discounts
- Check multiple sellers for the same style
- Look for bundle deals on multiple sets
- Use price tracking tools for Amazon listings
- Browse seasonal sales (holiday, back-to-school)
4. Red Flags to Watch
Be cautious of these red flags that may indicate a potential scam or low-quality product:
- Suspiciously low prices
- Missing size information
- Poor quality product photos
- No customer reviews
- Unclear shipping policies
5. Smart Shopping Strategies
Here are some smart shopping strategies to help you make informed decisions when buying press-on nails online:
- Purchase sample sizes first
- Read recent reviews thoroughly
- Screenshot designs you like
- Compare shipping times
- Check material descriptions
6. Value-Added Features
Look out for these value-added features that can enhance your experience with press-on nails:
- Reusability claims
- Extra adhesive tabs
- Prep tools included
- Storage case
- Application instructions
When browsing designs, save your favorites in a wishlist and check back for price drops. Many sellers offer loyalty programs or bulk discounts for regular customers. Consider subscribing to price alerts on marketplace platforms to catch the best deals on your desired styles.
Step-by-Step Guide to Applying No Glue Press-On Preppy Nails at Home
Achieving salon-worthy preppy nails at home is simple with these essential application steps:
1. Prep Your Natural Nails
- Remove old polish completely
- Push back cuticles gently
- Buff nail surface lightly
- Clean with prep pad to remove oils
- Let nails dry completely
2. Size and Sort Your Press-Ons
- Lay out all press-on sizes
- Match each nail to corresponding press-on
- Create size sequence from thumb to pinky
- File edges if needed for perfect fit
3. Perfect the Application
- Start with your dominant hand
- Press firmly from center to edges
- Hold each nail for 30 seconds
- Work one finger at a time
- Save thumb for last
Pro Application Tips:
- Apply in a well-lit area
- Avoid touching nail bed after cleaning
- Keep hands steady during application
- Use tweezers for precise placement
- Remove air bubbles by pressing outward
Quick Fixes During Application:
- Crooked placement? Remove immediately and try again
- Gap at cuticle? Size down to next smaller nail
- Edges lifting? Apply extra pressure at corners
- Too long? File after application for desired length
For Long-Lasting Results:
- Avoid water for 2 hours after application
- Apply top coat for extra shine
- Wear gloves for household chores
- Keep spare nails for emergencies
- Check fit daily and adjust as needed
Maintaining Your Preppy Nails – Care Tips and Tricks
Keeping your preppy nails looking fresh and polished requires consistent care and attention. Here’s how to maintain your nail designs and protect your natural nails:
Daily Care Routine
- Apply cuticle oil twice daily to prevent dryness and maintain flexibility
- Wear gloves while doing dishes or cleaning to protect designs
- Avoid hot water exposure for extended periods
- Use gentle hand motions to prevent catching or snagging
- Keep nails dry after washing hands to prevent lifting
Press-On Nail Maintenance
- Gently file any rough edges that develop
- Clean underneath press-ons with a soft brush
- Reapply adhesive tabs if edges start lifting
- Avoid using nails as tools to open containers
- Replace individual nails if damage occurs
Safe Removal Process
- Soak nails in warm water for 10-15 minutes
- Apply cuticle oil around edges
- Gently lift from sides using orange stick
- Never force or pry off press-ons
- Remove residual adhesive with nail polish remover
Natural Nail Recovery
- Take breaks between applications
- Use strengthening base coat during breaks
- Keep natural nails trimmed and filed
- Apply nail hardener weekly
- Maintain a balanced diet rich in biotin
Professional Care Tips
- Schedule regular manicures every 2-3 weeks
- Have professionals remove acrylics or gel
- Address any lifting or damage promptly
- Use quality products for home maintenance
- Consider nail supplements for added strength
Remember to listen to your nails – if you notice any unusual changes or damage, give them time to recover before your next preppy nail application.
FAQs (Frequently Asked Questionsc Preppy Nail)
What defines preppy nail designs and why are they popular among teens and young adults?
Preppy nail designs are characterized by polished, neat, and timeless aesthetics inspired by classic fashion styles. They often feature patterns like plaid, stripes, and checkerboard, with typical nail shapes such as oval, almond, and squoval. Their popularity among teens and young adults stems from their stylish yet elegant look that complements both casual and preppy outfits.
What essential tools and products do I need to create perfect preppy nails at home?
To achieve flawless preppy nails, consider using no-glue press-on nails like the KISS imPRESS brand for convenience. A typical nail kit includes prep pads for cleaning nails, mini files for shaping, and manicure sticks for cuticle care. Selecting the right size and shape of press-on nails ensures a natural look and comfortable fit.
How can I create a classic burgundy French manicure with a modern twist?
Start by applying a clean French tip using burgundy polish instead of the traditional white. Add subtle accents such as thin colored lines or minimalistic designs to give it a contemporary edge. This design is ideal for occasions where you want a sophisticated yet stylish look.
What are some trendy preppy nail art patterns I can try?
Popular preppy nail art patterns include pink plaid designs on short squoval nails for a playful look, bold checkerboard patterns in shades like dark pink for sophistication, soft sweater texture-inspired nails using gel or acrylics, pink chrome nails for a shiny modern finish, minimalist smiley face accents on pastel backgrounds, and floral motifs combined with French tips or plaid bases.
Why are short squoval nails considered the perfect shape for preppy nail styles?
How do I properly apply and maintain no-glue press-on preppy nails at home?